Monday, October 27, 2014

Sewing Party

Age of Birthday Girl: 10 years
Age Range of Guests: 8-12 years
Gender of Guests: girls

Potential Age Range of Theme: 6-13+ depending on the tasks presented.  If you keep the party a no-sew theme then the age range could run lower. If you have the tasks be more intricate or involved then you could extend it well into the teen range.

Invitations: For a sewing party we naturally had to sew the invitations!  Rectangles of fabric were cut out and tacked to card stock.  Cream card stock was printed with "You Are Invited..." and the placed on top of the fabric.  

This was all sewn together on the sewing machine using a simple programmed pattern.  On the back of the invitation we glued cream card stock to hide the thread.  Information about the party was printed on this piece of card stock ahead of time, along with some sewing clip art.

Cake: The cake was inspired by one of the projects for the party - a no-sew pillow made from felt and colorful strands of ribbon.  A round layer cake was covered in white frosting.  Strips of fondant were woven together and then trimmed to fit the top of the cake. Edible paper and markers were used to create a measuring tape that was wrapped around the bottom of the cake.


Activities: The party was planned in stations with a different craft project at each one.

Station One: This was the no-sew pillow which inspired the cake.  Here, the party guests chose a felt backing for their pillow and strips of pre-cut colored ribbon.  They wove the ribbon together into a square.  The felt backing was pre-cut around the edges to have the same number of strips of fringe as ribbon.  The woven ribbon was placed on top of the felt and the girls tied a ribbon to a felt strand all around the square.  Before it was closed off they filled it will pillow stuffing.

NOTE: This activity took longer than we expected so some of the guests finished them at home. Also, the cut ribbon started to fray fairly quickly so if we were to do this again we would take the time to sew the ribbon ends to ensure they would remain clean after the party. The resulting pillows though were colorful and fun!


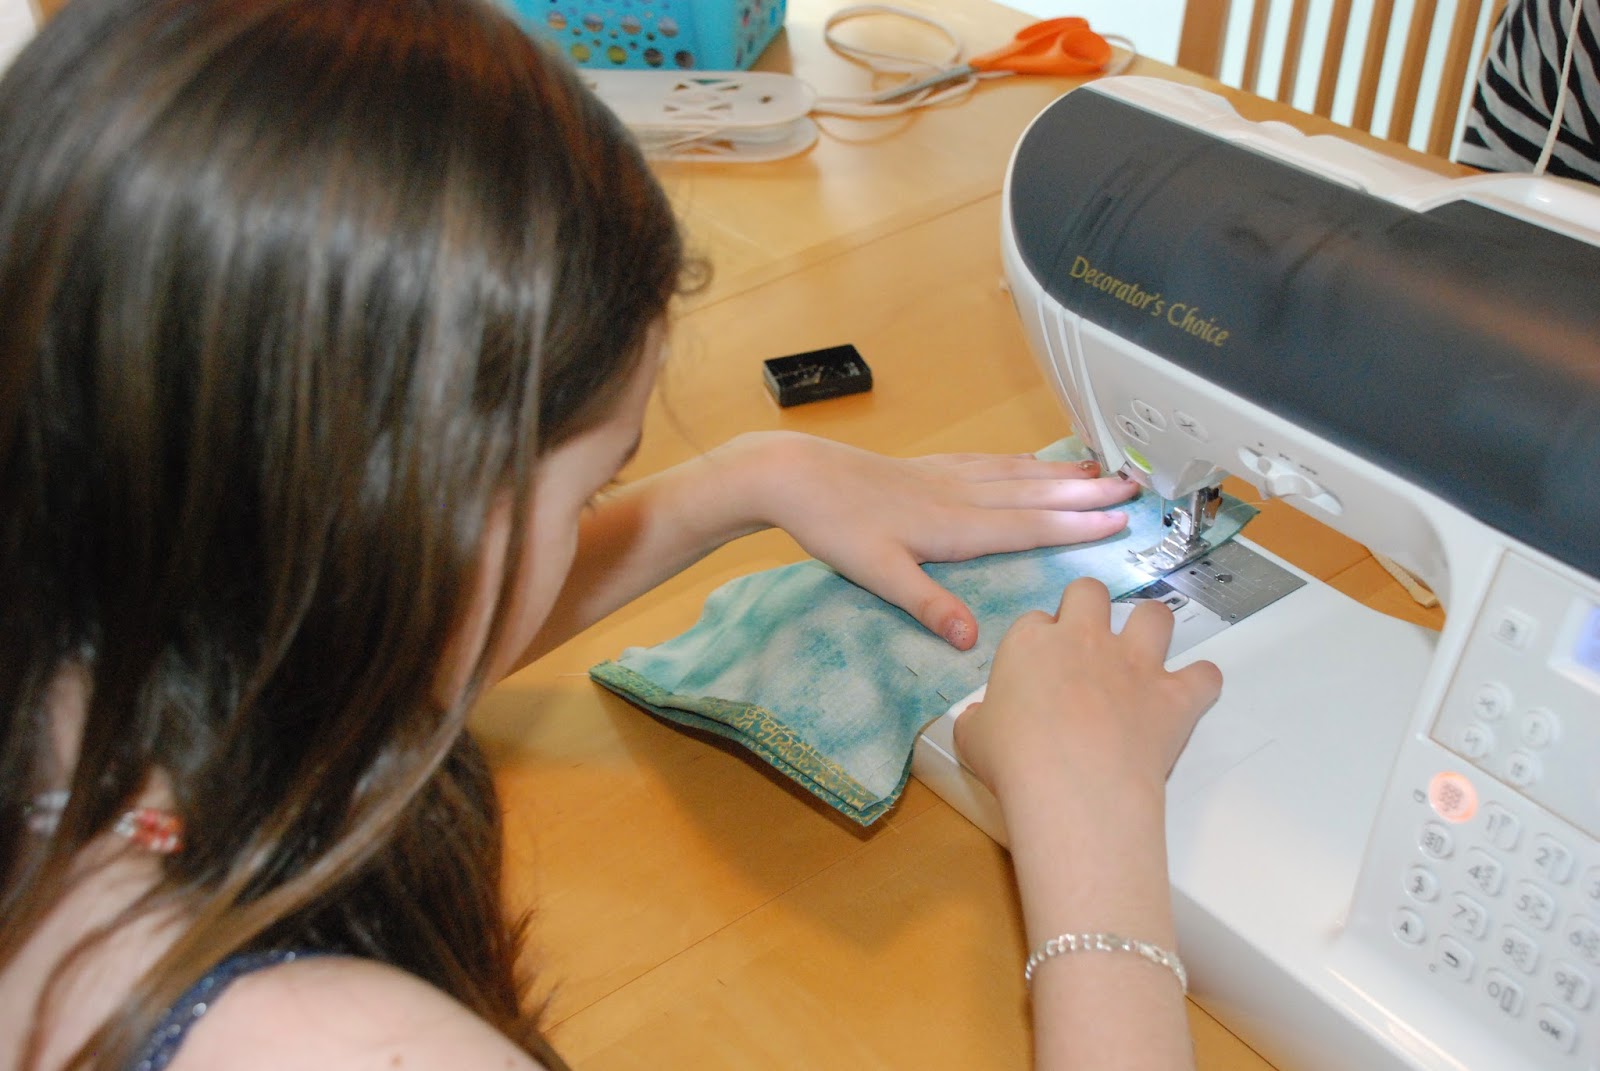
Station Two: Using the sewing machine, (under direct adult supervision since many of the girls had never used one before), each guest made a simple drawstring bag which would serve as their goodie bag.

Each girl selected a pre-cut piece of fabric which was twice as long as the bag would be. The short ends were folded over (wrong side together) about a 1/2 inch and sewn to create a slot for the string.  Then the fabric was folded in half, right sides together, and the long edges were sewn being careful not to sew the opening closed where the string would be inserted.  The girls chose their string color, inserted it into the slot, pulled it through and then tied the two ends together.  So easy and they were all thrilled to have created their own personal bag.


Station Three: This was a jewelry making station which was led by two of the dads - they really got into it (and were seen still working on their creations long after the girls had finished)!

The girls were given a selection of beads & charms and used wire to create bracelets.  The dads were there to help cut the wire and crimp the beads at the end if the girls needed help, but most of them could do it on their own.


Station Four: This was the waiting area since the sewing machine could only be used one at a time and the jewelry station only had a certain number of tools. If someone had down time they could select something to color/create, or they could assemble their goodie bags.

Goodie Bags: As previously mentioned, the girls created their own goodie bags by sewing a simple drawstring bag.  These were filled with a variety of candies, as well as their hand-made jewelry, and some fun stickers.  They also took home their hand-made no-sew pillows.


Wednesday, October 1, 2014

Circus or Carnival

Age of Birthday Girl: 7 years old
Age Range of Guests: 5-10 years old
Gender of Guests: boys and girls

Potential Age Range of Theme: 3-12 years, depending on specific focus & activities

Cake: This turned out great with just a little bit of extra effort.

1. The base is a simple round layer cake frosted in white.
2. A toilet paper or paper towel holder (depending on how high you want the roof) was covered with aluminum foil and placed in the center of the cake, pressing firmly so it stays upright.
3. Four lollipop sticks were placed around this center piece.
4. Computer printouts of carousel horses (double sided) were glued onto those sticks.
5. A roof was constructed out of card stock by cutting out a circle and then making a slit from the edge to the center.  Overlap the edges until you et the desired size/cone and then tape it together. Trim any pieces that are sticking out after the overlap step.
6. Four pieces of ribbon were attached to the center of the roof down to four more lollipop sticks evenly spaced near the edge of the cake
7. Candies were used to decorate the base - we used M&Ms and gummy lifesavers but you could use any favorite candy.
8. The candles were placed as close to the edge as possible just before lighting them to avoid setting the roof or ribbon on fire!

Activities: The guests were all greeted by dad, graciously wearing the clown wig and glasses (which the kids all wanted to try on of course). Once everyone arrived they were divided into groups to go through the circus activities.  
There was a face painting station where the kids could do their own painting on the faces or hands, or they could have a supervising adult do it, or another party guest. We used examples from the Klutz Face Painting book which had cards you could take out of the book with simple steps for a variety of creatures and designs.
Dad, the clown, showed the kids how to create simple balloon animals at another station.  Some of the kids really got into this one since most of them had never tried to make one on their own. There was a place to walk to tightrope (a wooden beam a few inches of the ground) and swing on a trapeze (our tree swing). And the kids got to shoot teddy bears through a "ring of fire" (a hula hoop with streamers) using a large elastic exercise band tied to a tree!

The finale was to gather everyone together and do a version of the clowns in the car.  First we piled everyone into our minivan.  Then we took video of them as they came out one by one.  The first video just had them all come out once, but then we tried it again with the back of the van open and out of the picture frame.  As kids came out they ran back around, put on a new hat or scarf to change their look, climbed into the back of the van, and came back through the door again - loads of fun!!

Unfortunately the videos are too large to include on the webpage but I think you get the idea!!

Monday, September 29, 2014

Stop-Motion Video Party

Age of Birthday Boy: 11 years old
Age Range of Guests: 7-13 years old
Gender of Guests: Boys and girls

Potential Age Range of Theme: 6-14+ years, depending on specific focus & activities

This one was just plain fun!  We recruited some parents with cameras and tripods and some familiarity with video creation in a Mac computer to help us out and everyone had a great time. (If you have enough kids who have this knowledge you could run this party without as many adults as we needed. Actually, if we did this party today I think the kids would know more than most adults about this sort of thing)!

Invitations: The invitations were similar to this sign.  Instead of saying "welcome to..." it said "You Are Invited to The MacBeath Stop-Motion Studio". It was put onto black card stock and the movie reel image is actually a sticker found at Michael's Craft Store.  Party information was attached to the back.

Cake: So easy and it turned out great!  A 9x13 inch cake was tapered into the shape of a popcorn bag and covered with white frosting.  Red fruit rollups were used to create the stripes.  The popcorn label was created on the computer and printed onto paper to be placed on the cake. (You could do this all with fondant as well). We popped some popcorn and mixed it with with melted butter and melted marshmallows.  While it was still a little warm we shaped it onto the cake to look like it was overflowing the popcorn bag. Leftover popcorn mix was shaped into balls, wrapped in plastic wrap, and included in the goodie bags.

Activities: This party had one main activity: creating stop-motion videos using Lego as the primary tool.  As the party guests arrived they received a film crew ID tag to grant them access to the production set.

They were divided into 4 groups with an adult and a camera assigned to each group.  We ended up with three groups of boys and one group of girls who were siblings of invited guests.

They were given a brief demonstration of stop-motion techniques for those who had never tried it before (smaller movements between shots will produce a smoother look but take more time, ways to hide supports so it looks like a piece is in the air, keeping the background clean, etc).


Then they had time to create - approximately one hour.  Each group had a Lego base to work on, and a large pile of miscellaneous Lego pieces and characters to use in the video. The adults were instructed to step in only when needed to help keep disagreements to a minimum, to make sure everyone gets a say in the process, and to assist with camera work as necessary.  Basically though, they were the support staff.

The results were terrific and very creative!  We downloaded the videos to our computer while the guests enjoyed cake & ice cream. Then the groups took turns demonstrating their videos to each other.  A couple of samples are included at the end of this blog post if you care to see what they came up with in a fairly short period of time.

Goodie Bags: We used Dollar Store popcorn containers as the goodie bags.  Inside we put some Twizzlers, a chocolate bar, the sticky popcorn balls, and a bag of microwave popcorn for later.  They were also each promised a copy of the videos that were created at the party.


Sunday, September 28, 2014

Horses!

Age of Birthday Girl: 9 years old
Age Range of Guests: 6-12 years old
Gender of Guests: mostly girls

Potential Age Range of Theme: 3-12 years, depending on specific focus & activities

When our daughter was nine she was in love with horses.  We managed to get her a few lessons but it is not easy around here and it gets expensive very quickly.  However, we indulged her interest by having a horse-themed party - no pony rides though!

Cake: We covered a 9x13 cake in green frosting for grass.  You could cover it with coconut flakes dyed green for more texture but we had two party guests with tree nut allergies so didn't go that route. The fence was found at a hobby store, but you could also just use popsicle/craft sticks.  Dirt inside the corral was made from chocolate cookie crumbs. The gate was part of a horse play set we already owned, as was the bale of hay & bucket.  The flowers are part of our Playmobil collection.  We found the horses and riders at a dollar store, all together as a set. We bought extras as party favors for the goodie bags.

Activities: Once again Dad put on a good show in working out party games.  The kids were asked to participate in a variety of activities related to caring for, or being a horse.  They pretended to be horses who were rolling around on the grass and competed to see who could roll down our front hill the fastest.  They scoured the yard to look for "hay" in the form of the longest blade of grass. They made sure there was enough water for all the horses in their care and had to count & cart water bottles from one area to the next.  The kids also completed an obstacle course jumping over objects to represent bales of hay, water hazards, fences, and other items in a horse jumping show.

(The water bottles were left over from a water shortage we had recently experienced when a major water main broke in our area - thousands were without clean water for drinking for a few days. All the large gallon jugs were sold out so we were left with individual water bottles instead.  They came in handy for the party which was, fortunately, after the water was working again).

Goodie Bags: Party guests received a cloth bag for their party favors.  Inside was a selection of candy, some plastic horses & riders from the play sets, a variety of horse stickers, a horse-themed self-inking stamp, and a plastic bracelet with a horse charm.

Saturday, September 27, 2014

Music Party

Age of Birthday Girl: 6 years old
Age Range of Guests: 5-10 years old
Gender of Guests: boys and girls

Potential Age Range of Theme: 2-12 years, depending on specific focus & activities

This party was before everyone had an iPod (remember those days!) and so the focus was on making or creating music, not just listening to it.  The kids ranged in age from 4-9 years old, and included both boys and girls.

Invitations: Unfortunately we have lost our photos of the actual invitations.  However, they were something very similar to this.

We took black card stock and attached pieces of sheet music to it. Then we placed a black music note on a smaller piece of white card stock, placing that on top of the music. We then wrote "you are invited..." in silver ink on the music note.  The back of the card had the party information for guests.

Cake: Using two 9x13 cakes we placed one on top of the other (with frosting in between the layers). Then we carved the front part of the piano shape out of the top layer, being careful to save some of it in decent shape for the piano bench.  Both layers were carefully shaved and shaped around the other end to form the grand piano profile.

The whole thing was covered in frosting - we opted for white because that is what our daughter wanted, but you could try for a black grand piano if you wanted to go that route.  The piano shape was outlined in pink frosting and we added a "6" for the birthday girls' age.  The piano keys were added with black frosting.  You could also use fondant for the keys and other accents for a cleaner look.

Activities: First the guests created some rhythm sticks to be used in later activities.  Wooden dowels were covered with decorative tape and ribbon.  They also created tambourines made out of paper plates. Ribbons were used to tie small bells to the plates through holes punched around the edge.

The kids used the sticks, tambourines, and their hands for clapping to create rhythmic patterns with their names, or favorite ice cream flavors, or favorite colors, tapping to the beat of the words.


Then the kids were given small instruments (shakers, bells, tambourines, etc.) and were asked to copy rhythms that the party girl's dad made more and more complicated with each repetition - they loved his crazy variations which ended with a complicated selection that went on for so long that Dad fell over from exhaustion!!

The kids watched the Do-Re-Mi sequence from "The Sound of Music" and then recreated a section of it as a group.  Each child was given a card with the note from the musical scale and a picture to help them remember which one they were given and then they sang along with the video, standing and sitting as their particular note came and went - a bit chaotic, but lots of fun!

Goodie Bags: The kids all took home their rhythm sticks and tambourines.  In addition they all received a shaker and musical stickers.  Pencils and notepads were included with music themes and the rest of the bag was filled with a variety of candy.

Friday, March 14, 2014

Secret Agent Party


Age of Birthday Boy: 10 years old
Age Range of Guests: 7-12 years old
Gender of Guests: boys and girls

Potential Age Range of Theme: 5-13+ years, depending on specific focus & activities


Invitations: The invitations were requests to join a top secret agency of spies.  Guests were asked to report to headquarters (our house) at a certain date and time for training to become secret agents.

Cake: This one was easy but still turned out great.  We made a stencil template on paper that read "TOP SECRET", placed it gently on a frosted 9x13 cake and sprinkled red sprinkles over top.  To make it neater we could have used a stiffer icing or a larger piece of paper but for the limited time we had to prepare we think it turned out really well.


Activities: As guests arrived their names were checked off the official secret agent training camp list.  They were given name tags to wear and each guest chose an alias or code name, marking their name tag with a fingerprint (using washable ink).

Guests were put into two groups of new recruits - it happened to be a girls team and a boys team this time but it didn't have to work that way.  The teams were instructed that they would go through secret agent training to see if they had what it takes to be a spy.  There would be stations to get through to test such qualities as teamwork, accuracy, agility, and problem solving.

Teamwork: This was essentially the human knot game - an old stand-by that remains a favorite.  The kids stood in a circle and reached across it to grab someone's hand.  Anyone's hand was fine as long as you weren't holding both hands of the same person.  Then they tried to untangle themselves into one big circle.  You could also try this blindfolded for a bigger challenge, or have only some kids blindfolded and/or some unable to speak.

Accuracy: In this challenge one of our secret agent instructors (aka: dad) sat by a tree.  The kids were given water balloons and told to break the balloons on the tree over the head of the instructor.  Points were awarded for correct placement, and deducted if you hit the instructor. Of course, some kids didn't care about the deductions so the instructor got fairly wet!!

Agility: Teams were given a rope with loops for handles and instructed to go through an obstacle course all together single file.  We set up chairs to crawl under, board to cross, hoops to jump through, etc.

Problem Solving: Here, teams were given some items and a task.  They had to create something long enough to reach and grab a key hanging on our play structure while they stood on the deck.  The kids had to figure out the best way to use the sticks, rope, and a hook to create something both long enough and strong enough to reach, grab, and retrieve the key.

Final Challenge: As kids were finishing up their last task it was announced that an urgent matter had come to the attention of the instructors.  Since all other active agents were currently assigned it had fallen to the new recruits to solve the mystery for the agency.  They were given clues and coordinates to a hidden stolen treasure.

The teams had to decipher the coded messages to determine the general location of the treasure.  Then they had to follow instructions for placing string from one spot, across the playground area, to another spot.  This was done 3 times.  Where all the strings crossed is where they were to dig for the treasure (sort of an X marks the spot kind of thing!).  Each team had a different specific location in the same general area.

Both teams found their treasure which meant all the new recruits graduated form their training and were granted full secret agent status.

Goodie Bags: Kids were given certificates of completion and they also kept their new recruit name tags. In addition to various candies and chocolates, the goodie bags included a stick-on mustache and sunglasses to help with their spy disguises.  Each child also got a pen and notepad as well as a spy decoder ring.

This party was a bit more work to pull together as far as planning the activities, but was so much fun - as long as you don't mind kids digging up your yard! Fortunately we were getting our playground area ready for wood chips so it was ready for the purpose.  A sandbox would work just as well.


Monday, September 30, 2013

Ballet, Dance


Age of Birthday Girl: 8 years old
Age Range of Guests: 5-10 years old
Gender of Guests: boys and girls

Potential Age Range of Theme: 3-12 years, depending on specific focus & activities

When our middle child turned 8 she was taking dance class and wanted a ballet birthday party.  (Who knew at the time that this recreational dance class would turn into the hours and hours of dance it is today?!)

Invitations: We cut ballet slipper shapes out of pink card stock and glued them onto white card stock.  A pink bow was added to the front with "You're invited... (A little bit like this...).  Party details were printed on the back.

 Cake:  We used a 9x13 cake pan and then created a template out of wax paper and carved ballet slipper shapes out of the cake. These were then covered with pink frosting with white in the middle for the inside of the shoes.  Pearlized candy was added around the edge of the white area with a small frosting bow on the toe.  Real pink ribbon was added to turn them into pointe shoes. We were greatly inspired by this tutorial.

Activities: The party guests each decorated crowns found at Oriental Trading Company using stickers, jewels, ribbon, and markers.

The kids also had the chance to take strips of ribbon and tulle to create a simple tutu by tying the strips onto a main waistband piece of ribbon.  Most guests didn't finish at the party and took strips of cloth home with them to finish it up there.

 They all got a brief ballet lesson, led by Dad of course - what a good sport! - and then we played a version of musical chairs where the kids had to dance around the basement and when the music stopped they went to a photo of a ballerina in a certain pose.  They had to copy the pose as they stood next to it.

Then, in two teams, they created poses with props and costumes. The other team got to look at it briefly and then the original team would change something.  The other team had to figure out what had been changed.

Another variety of this game would be to have one team create a pose and the second team looks at it briefly. Then that second team has to recreate it themselves.

Goodie bags: Pink and blue goodie bags were filled with candy treats, ballet/dance stickers, ballet pencils and notepads, hair scrunchies, and bracelets.